Deployment
- Word Press
- Asterisk PBX
- sip.conf config file update
- Static IP address for asterix computer
- Definitions
- extensions.conf file configuration
- Softphone
- Linux General Issues
- Moodle Upload Very Slow
Word Press
Lessons Learned
Novaschool.org Lessons Learned
Main Photo and tag line are updated under: Site Settings/Site Identity In Elementor
Recaptcha had to re-registered on google and updated on the new Word Press Site.
Elementor had to be re-installed, the publish button was not available. The work around was to use the regular editor page to force publishing changes.
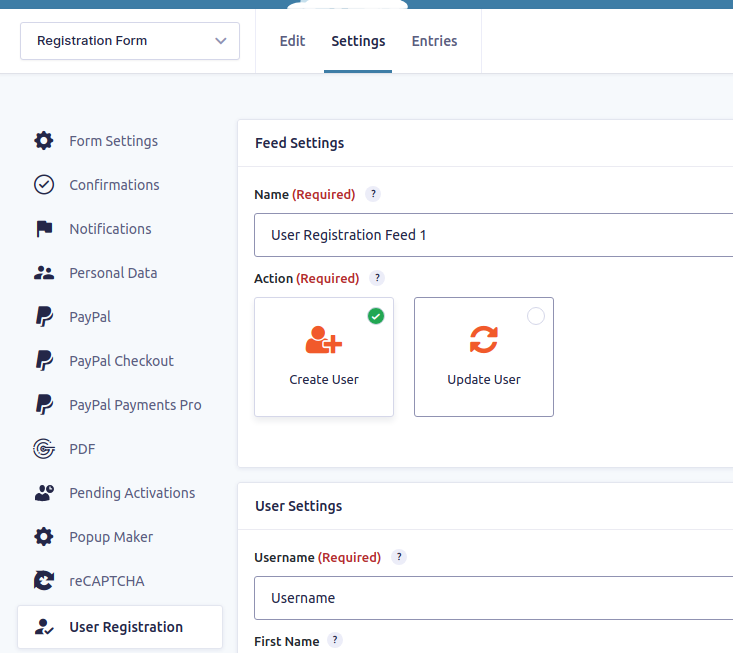
Gravity registration form did not create a user. But settings looked OK.
Asterisk PBX
sip.conf config file update
Instructional Video
Specification
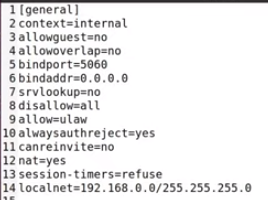
- allowguest=no - this setting determines if anonymous callers are permitted to place calls to Asterisk. This defaults to ‘yes’.
- allowoverlap=no - limits the time between digits when dialing with the system
- bindport=5060 - 5060 is the default
- bindaddr=0.0.0.0 - this is the default IP address to listen on (all network interfaces)
- srvlookup=no - default is yes
- disallow=all - disallows codecs
- allow=ulaw - allow codecs in order of preference
- alwaysauthreject=yes - rejects bad authentication requests on valid usernames, deny remote attackers the ability to detect existing extensions with brut-force
- canreinvite=no - ? default is yes.
- nat = yes - ? default is no
- session-timers=refuse - stops session timers from ending calls
- localnet=69.209.19.198 - needs to be the IP address range we have in your network.
Device Settings

SIP Configuration – general
The [general] section of sip.conf includes the following variables:
- allowsubscribe = yes|no : Allow or Ignore Subscribe requests
- allow = <codec> : Allow codecs in order of preference (Use DISALLOW=ALL first, before allowing other codecs)
- disallow = all : Disallow all codecs (global configuration)
- A codec is a hardware- or software-based process that compresses and decompresses large amounts of data.
- allowexternaldomains = yes|no : Enable/Disable INVITE and REFER to non-local domains. Default yes. (New in v1.2.x).
- allowguest = yes|no : Allow or reject guest calls. Default is yes. (this can also be set to ‘osp’ if asterisk was compiled with OSP support). (New in v1.2.x).
- allowoverlap = yes|no : Enable/disable overlap dialing support. Default yes (Overlap dial provides for a longer time-out period between digits, also called the inter-digit timer. With overlap dial set to off, the gateway expects to receive the digits one right after the other coming in to this line with very little delay between digits. With overlap dial set to on, then the device waits up to about 2 seconds between digits).
- Set “alwaysauthreject=yes” in your sip.conf file. This option has been around for a while (since 1.2?) but the default is “no”, which allows extension information leakage. Setting this to “yes” will reject bad authentication requests on valid usernames with the same rejection information as with invalid usernames, denying remote attackers the ability to detect existing extensions with brute-force guessing attacks.
-
Customers started to complain that Incoming calls were dropping after 15mins exactly and Outgoing calls were dropping after 30mins… I took a look into the problem and correcly so… they were!
After loads of digging around the Trunk Settings, calling up the SIP provider (GammaTelecoms) blaming them… I found a setting from running the command from the Asterisk Debug “asterisk -rvvv” sip show settings > Global Signaling Settings:
Session Timers: Accept
Session Expires: 1800 (30mins) - autocreatepeer = yes|no : If set, anyone will be able to log in as a peer (with no check of credentials; useful for operation with SER). Default no.
- autodomain = yes|no : Enable/disable Asterisk’s ability to add local hostnames and local IP address to the domain list. externip or externhost are also taken into the domain list. Default no. (New in v1.2.x).
- bindaddr = IP_Address : IP Address to bind to (listen on). Default 0.0.0.0 (all network interfaces).
- binds to all network interfaces on the current computer (instead of just localhost - 127.0.0.1 or the hostname),
- Using
0.0.0.0will only bind to IPv4-enabled interfaces. However, if you bind to::, that should cover all IPv4 and IPv6 interfaces, assuming your TCP/IP stack (and Java) have IPv4-compatible IPv6 sockets enabled.
- bindport = Number : UDP Port to bind to (listen on). Used to be port in Asterisk v1.0.x. Default 5060.
- Unlike the TCP ports, UDP ports do not need to establish connections before transferring data.
- callerid = <string> : Caller ID information used when nothing else is available. Defaults to asterisk. (The ability to override the default appears to available in Asterisk 1.0.9. Unsure about other versions.)
- canreinvite = update|yes|no|nonat (global setting): For some reason this defaults to yes, so beware…
- checkmwi = Number : Global interval (in seconds) between mailbox checks. Default 10 seconds. (New in v1.2.x)
- compactheaders = yes|no : Indicates Asterisk should send compact (i.e. abbreviated) headers in the SIP messages. Default no. (New in v1.2.x)
- context = <contextname> : This is the default context and is used when a endpoint has no context property. The context in section of an endpoint is used to route calls from that endpoint to the wanted destination. The context body is located in extensions.conf.
- defaultexpiry= Number : Default duration (in seconds) of incoming/outgoing registration. Default 120 seconds.
- domain = domains : Comma separated list of domains which Asterisk is responsible for. (New in Asterisk 1.2.x)
- dtmfmode = inband|info|rfc2833 (global setting). Default rfc2833. Warning: inband very high CPU load.
- dumphistory = yes|no : Enable support for dumping of SIP conversation’s transaction history to LOG_DEBUG. Default no. (New in v1.2.x)
- externip = IP_Address or a hostname : Address that we’re going to put in SIP messages if we’re behind a NAT. If a hostname is used as the value, then the IP address associated with the hostname is looked up only once during the reading of the sip.conf. If you want support for a hostname associated with a dynamic IP address, use externhost.
- externhost = hostname.tld : (New in Asterisk 1.2.x)
- externrefresh = Number : Specify how often (in seconds) a hostname DNS lookup should be performed for the value entered in ‘externhost’. Default 10 seconds. (New in Asterisk 1.2.x).
- fromdomain = <domain> : Sets default From: domain in SIP messages when acting as a SIP UAC (client)
- ignoreregexpire = yes|no : Indicates whether to use Contact information about a peer even if the information is stale because it has reached its expiration time. Default no. (New in v1.2.x)
- jbenable = yes|no : Enables the use of a jitterbuffer on the receiving side of a SIP channel. (Added in Version 1.4)
- jbforce = yes|no : Forces the use of a jitterbuffer on the receive side of a SIP channel. Defaults to “no”. (Added in Version 1.4)
- jbmaxsize = Number : Max length of the jitterbuffer in milliseconds. (Added in Version 1.4)
- jbresyncthreshold = Number : Jump in the frame timestamps over which the jitterbuffer is resynchronized. Useful to improve the quality of the voice, with big jumps in/broken timestamps, usually sent from exotic devices and programs. Defaults to 1000. (Added in Version 1.4)
- jbimpl = fixed|adaptive: Jitterbuffer implementation, used on the receiving side of a SIP channel. Two implementations are currently available – “fixed” (with size always equals to jbmaxsize) and “adaptive” (with variable size, actually the new jb of IAX2). Defaults to fixed. (Added in Version 1.4)
- jblog = no|yes: Enables jitterbuffer frame logging. Defaults to “no”. (Added in Version 1.4)
- language = <string> : Default language used by any Playback()/Background().
- limitonpeers = yes|no: If set to yes use only the peer call counter for both incoming and outgoing calls (ref. hints, subscriptions, BLF; added in 1.4)
- localnet = NetAddress/Netmask : local network and mask.
- insecure = very|yes|no|invite|port : Specifies how to handle connections with peers. Default no (authenticate all connections). invite and port added in v1.2.x, yes and very removed in v1.6.x, possible to use multiple options separated by commas from v1.4.x
- maxexpiry = Number : Max duration (in seconds) of incoming registration we allow. Default 3600 seconds.
- musicclass = one of the classes specified in musiconhold.conf
- musdiconhold = same as musicclass
- nat = yes|no : Please note that as of Asterisk 1.0.x nat can now have the values: yes|no|never|route. Default no which really means to use rfc3581 techniques.
- Network Address Translation is defined in RFC 1631
- notifymimetype = mediatype/subtype : Allow overriding of mime type in MWI NOTIFY used in Asterisk cmd VoiceMail2 online messages. Valid MIME types can be found here. Default application/simple-message-summary. (New in v1.2.x).
- notifyringing = yes|no : Notify subscription on RINGING state. Default yes. (New in v1.2.x).
- outboundproxy = IP_address or DNS SRV name (excluding the _sip._udp prefix) : SRV name, hostname, or IP address of the outbound SIP Proxy. (New in v1.2.x).
- outboundproxyport = Number : UDP port number for the Outbound SIP Proxy. (New in v1.2.x).
- pedantic = yes|no : Enable slow, pedantic checking of Call-ID:s, multiline SIP headers and URI-encoded headers. Default no (in Asterisk 1.8 default yes).
- port = <portno> : Default SIP port of peer. (this is not the port for Asterisk to listen. See bindport).
- progressinband = never|no|yes : If we should generate in-band ringing always. Default never.
- promiscredir= yes|no : Allows support for 302 Redirects; (Note: will redirect them all to the local extension returned in Contact rather than to that extension at the destination). Default no.
- qualify = yes|no|milliseconds : Check if client is reachable. If yes, the checks occur every 60 seconds. Default no.
- realm = my realm (Change authentication realm from asterisk (default) to your own. Requires Asterisk v1.x)
- recordhistory = yes|no. Enable logging of SIP conversation’s transaction history. Default no. (New in v1.2.x).
- regcontext = context : Default context to use for SIP REGISTER replies from the SIP Registrar.
- register => <username>:<password>:[authid]@<sip client/peer id in sip.conf>/<contact> :Register with a SIP provider
- registerattempts = Number : Number of SIP REGISTER messages to send to a SIP Registrar before giving up. Default 0 (no limit). (New in v1.2.x).
- registertimeout = Number : Number of seconds to wait for a response from a SIP Registrar before classifying the SIP REGISTER has timed out. Default 20 seconds. (New in v1.2.x).
- relaxdtmf = yes|no: Default no.
- rtautoclear = yes|no|number : Auto-Expire friends created on the fly. If yes the autoexpire will be in 120 seconds. Default yes. (New in v1.2.x). Buggy up to 1.4.19, see bug 12707
- rtcachefriends = yes|no : Cache realtime friends by adding them to the internal list just like friends added from the config file. Default no. (New in v1.2.x). Buggy up to 1.4.19, see bug 12707
- rtsavesysname = yes|no : If set will write the value of asterisk.conf (options) systemname to the sip peer table in the field “regserver”. Useful for multi-server systems. (New in v1.?)
- rtpholdtimeout = Number : Max number of seconds of inactivity before terminating a call on hold. Default 0 (no limit). (New in v1.2.x).
- rtpkeepalive = Number : Number of seconds, when a RTP Keepalive packet will be sent if no other RTP traffic on that connection. Default 0 (no RTP Keepalive). (New in v1.2.x).
- rtptimeout = Number : Number of seconds, to wait for RTP traffic before classify the connection as discontinued. Default 0 (no RTP timeout). (New in v1.2.x).
- rtupdate = yes|no : Send registry updates to the database when using Realtime support. Default yes. (New in v1.2.x).
- sendrpid = yes|no : If a Remote-Party-ID SIP header should be sent. Default no.
- sipdebug = yes|no. Default setting for whether SIP debug is enabled upon loading of the sip.conf. Default no. (New in v1.2.x).
- srvlookup = yes|no : Enable DNS SRV lookups on calls. Default yes. (Default is no prior to v1.4.14)
- A DNS SRV record specifies a port within a server for certain services.
- tos = <value> : Set IP QoS parameters for outgoing media streams (numeric values are also accepted, like tos=184 )
- trustrpid = yes|no : If Remote-Party-ID SIP header should be trusted. Default no.
- useclientcode = yes|no : If yes, then the Call Originator as stated in the CDR will be changed to whatever is specified in a X-ClientCode SIP Header. Default no. (New in v1.2.x)
- usereqphone = yes|no : Indicates whether to add a “;user=phone” to the URI. Default no. (New in v1.2.x)
- useragent = <string> : Allow the SIP header “User-Agent” to be customized. Default asterisk.
- videosupport = yes|no : Turn on support for SIP video (peer specific setting added in SVN Dec 21 2005, bug 5427. Default no.
- vmexten = <string> : Dialplan extension to reach mailbox. Default asterisk. (New in v1.2.x)
- callevents = yes|no: Set to yes to receive events on AMI when a call is put on/off hold.
- disallowed_methods= (1.8.x) When a dialog is started with another SIP endpoint, the other endpoint should include an Allow header telling us what SIP methods the endpoint implements. However, some endpoints either do not include an Allow header or lie about what methods they implement. In the former case, Asterisk makes the assumption that the endpoint supports all known SIP methods. If you know that your SIP endpoint does not provide support for a specific method, then you may provide a comma-separated list of methods that your endpoint does not implement in the disallowed_methods option. Note that if your endpoint is truthful with its Allow header, then there is no need to set this option. This option may be set in the general section or may be set per endpoint. If this option is set both in the general section and in a peer section, then the peer setting completely overrides the general setting (i.e. the result is *not* the union of the two options). Note also that while Asterisk currently will parse an Allow header to learn what methods an endpoint supports, the only actual use for this currently is for determining if Asterisk may send connected line UPDATE requests. Its use may be expanded in the future.
- preferred_codec_only= (1.8.x) Respond to a SIP invite with the single most preferred codec rather than advertising all joint codec capabilities. This limits the other side’s codec choice to exactly what we prefer.
- engine= (1.8.x) RTP engine to use when communicating with the device.
Static IP address for asterix computer
IP4.ADDRESS[1]: 192.168.1.226/24
IP4.GATEWAY: 192.168.1.254
IP4.ROUTE[1]: dst = 192.168.1.0/24, nh = 0.0.0.0, mt >
IP4.ROUTE[2]: dst = 169.254.0.0/16, nh = 0.0.0.0, mt >
IP4.ROUTE[3]: dst = 0.0.0.0/0, nh = 192.168.1.254, mt>
IP4.DNS[1]: 192.168.1.254
IP4.DOMAIN[1]: attlocal.net
IP6.ADDRESS[1]: 2600:1700:474:c000:9b88:85f:2cd8:a037/64
IP6.ADDRESS[2]: 2600:1700:474:c000:73be:3ec6:aef0:7123/>
IP6.ADDRESS[3]: 2600:1700:474:c000:f303:c56b:ca15:5ddb/>
IP6.ADDRESS[4]: 2600:1700:474:c000:6878:ba85:f244:ff5f/>
IP6.ADDRESS[5]: 2600:1700:474:c000::1c/128
IP6.ADDRESS[6]: 2600:1700:474:c000:ff1c:9a6a:784a:5ded/>
IP6.ADDRESS[7]: fe80::3dc7:2d58:9eb3:3a1c/64
IP6.GATEWAY: fe80::ae8f:a9ff:fe36:c132
ATT Internet
You can access your AT&T wireless gateway settings by typing 192.168.1.254 into your browser navigation bar. If you attempt to change a setting, you will be asked for your gateway's device access code. This code should be listed on the side or bottom(depending on how you have it orientated).
MAC Address
What is a MAC address (media access control address)?
A MAC address (media access control address) is a 12-digit hexadecimal number assigned to each device connected to the network. Primarily specified as a unique identifier during device manufacturing, the MAC address is often found on a device's network interface card (NIC). A MAC address is required when trying to locate a device or when performing diagnostics on a network device.
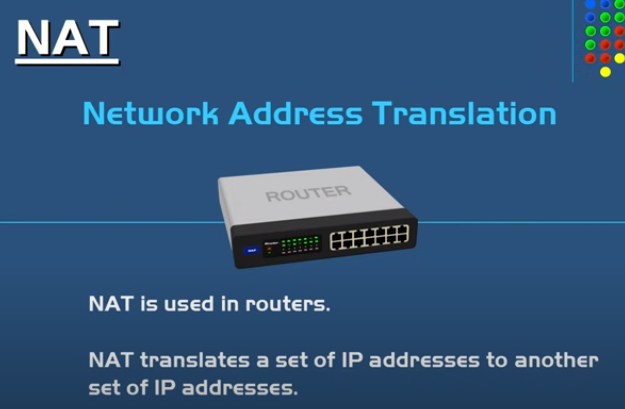
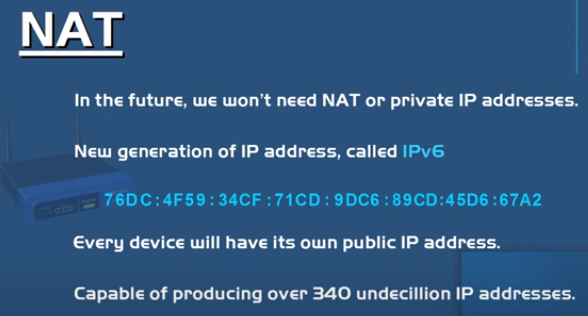
NAT
In the field of computer networking, NAT stands for Network Address Translation. In simplest terms, NAT allows many devices on a private network to share a single gateway to the internet. In turn, all of those devices will have the same public IP address—that of the gateway—and unique private IP addresses. These gateways are commonly found on wifi routers and some VPN services. For example, all of the devices connected to a NAT-enabled wifi router have different private IP addresses, but share the router’s public IP address.
FORUM ADVICE
For those that are not well versed in Linux, a step by step is as follows:
go to the local machine (computer running FreePBX/Asterisk)
login as: root
Password: (your password you used when you setup the software)
Type the next lines
cd /etc/sysconfig/network-scripts
sudo nano ifcfg-eth0
hit return
(use your arrow key to get where you need. Make sure NUMLOCK is on)
navigate to the line with BOOTPRONTO and go to the end of the line
Using backspace delete "dhcp"
Type in "none"
hit return
type the following lines;
NETMASK=255.255.255.0
IPADDR=192.168.1.3 (replace this with the IP address you want)
GATEWAY=192.168.1.1 (replace this with your router gateway address)
leave the rest as it is.
Hit the ctcl+ O keys (the letter not the number zero)
Hit enter again to save the file
hit ctcl+Z to exit the text editor
at the command prompt type the next line
service network restart
you should see the network card shut down and then restart, and all should be fine from here.
Ubuntu 18.04 and above use netplan to configure your network, and /etc/network/interfaces does not exist anymore. The netplan configuration file should be at /etc/netplan/.
Configuring an Interface with Static Network Settings Using ifcfg Files
ifcfg files, for an interface with the name enp1s0, create a file with the name ifcfg-enp1s0 in the /etc/sysconfig/network-scripts/ directory, that contains:
-
For
IPv4configurationDEVICE=enp1s0 BOOTPROTO=none ONBOOT=yes PREFIX=24 IPADDR=10.0.1.27
-
For
IPv6configurationDEVICE=enp1s0 BOOTPROTO=none ONBOOT=yes IPV6INIT=yes IPV6ADDR=2001:db8::2/48
You do not need to specify the network or broadcast address as this is calculated automatically by ipcalc.For moreIPv6ifcfg configuration options, see nm-settings-ifcfg-rh(5) man page
-
hh
Definitions
Subnet Mask
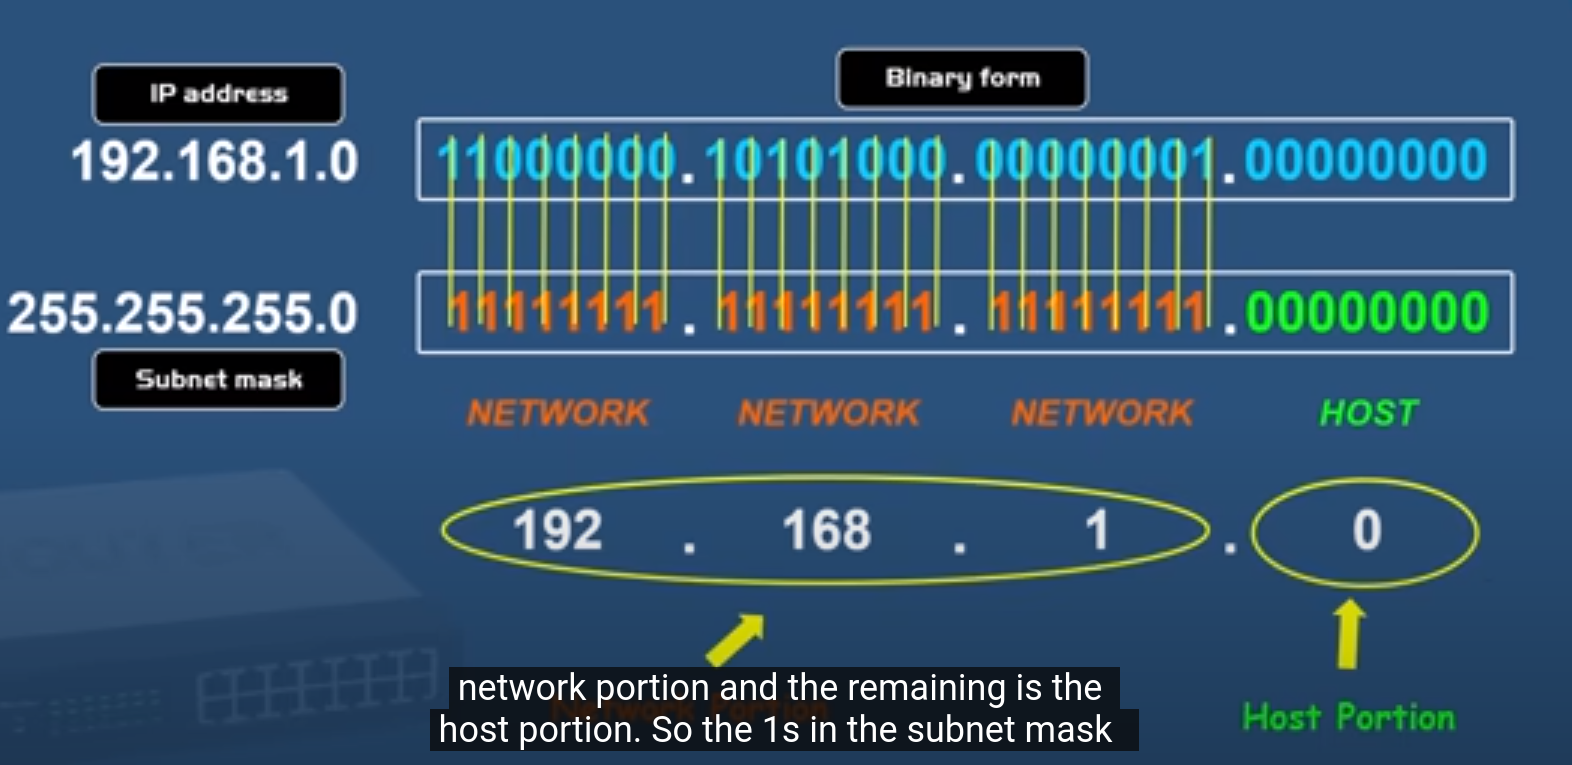
The subnet mask indicated which parts of the IP address belong to the network and which parts belong to the host.
Class C IP
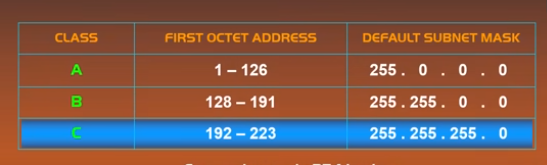
Class C IP address are given to small organizations that do not have a lot of hosts:
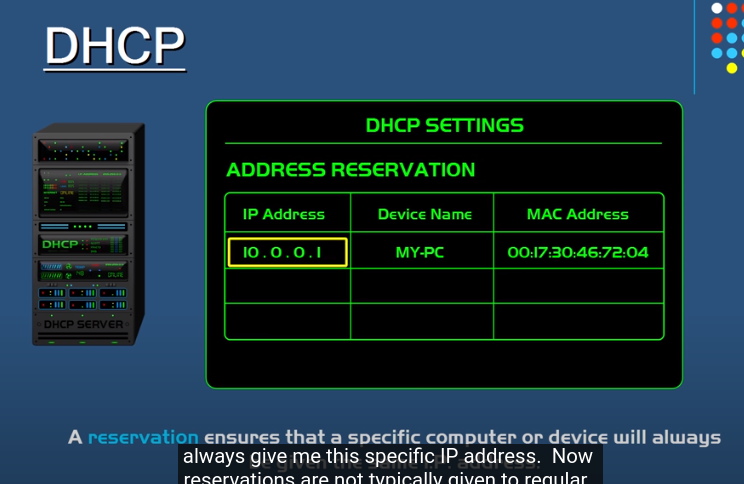
DHCP
Make a reservation on the DHCP to get a static IP address. Routers have the DHCP service built in to them.
NAT
NAT translates the private Ip to the Public IP
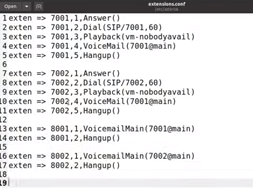
extensions.conf file configuration
extensions.conf
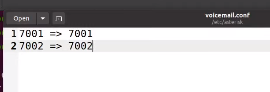
Voicemail.conf
Softphone
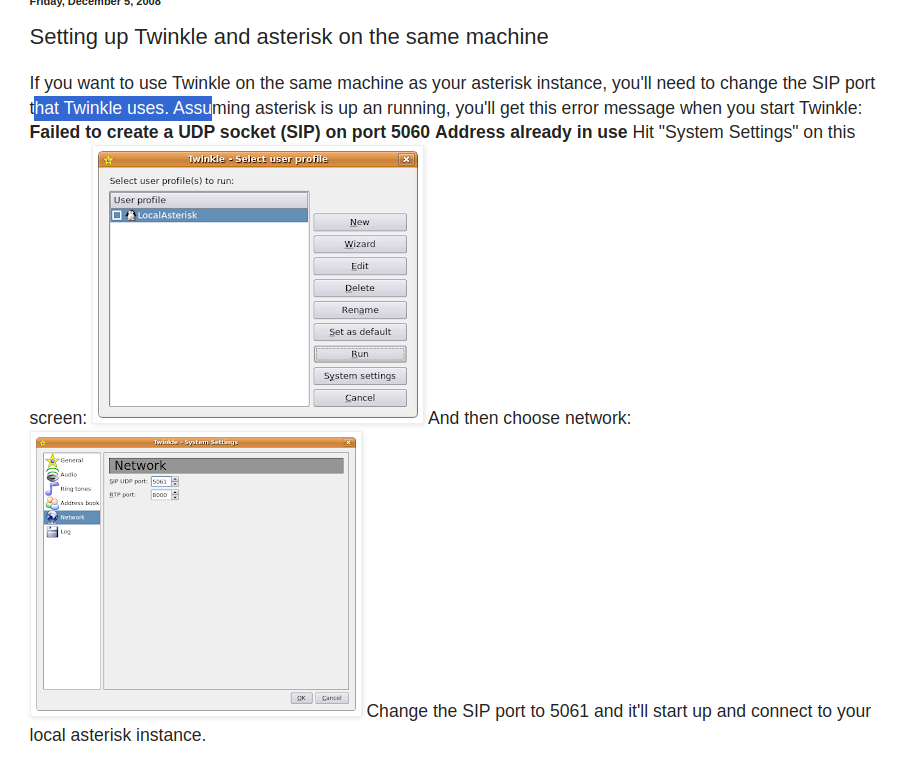
Twinkle
Linux General Issues
Setting Up Any Desk
How to Install Any Desk on Unbuntu
Change to root:
sudo -i
Step 1. Add Anydesk repository key to the Trusted software providers list.
wget -qO - https://keys.anydesk.com/repos/DEB-GPG-KEY | apt-key add -
Step 2. Now add the repository to the sources list.
Below command will put the repository entry in a new file under /etc/apt/sources.list.d/ directory.
* Execute as single command
echo "deb http://deb.anydesk.com/ all main" > /etc/apt/sources.list.d/anydesk-stable.list
Step 3. Update the apt cache by running below command.
apt update
Step 4. Now install the software. This command will download and install Anydesk from repository along with dependencies.
apt install anydesk
Issues
After installing AnyDesk, the following error is presented:
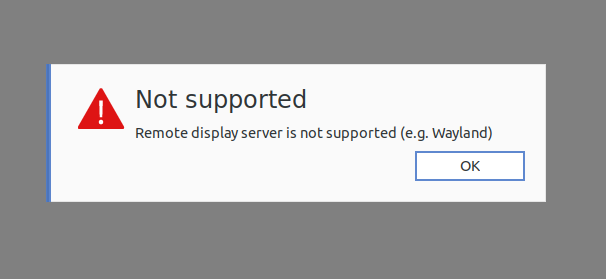
To fix the problem, we have to edit a file.
sudo gedit /etc/gdm3/custom.conf
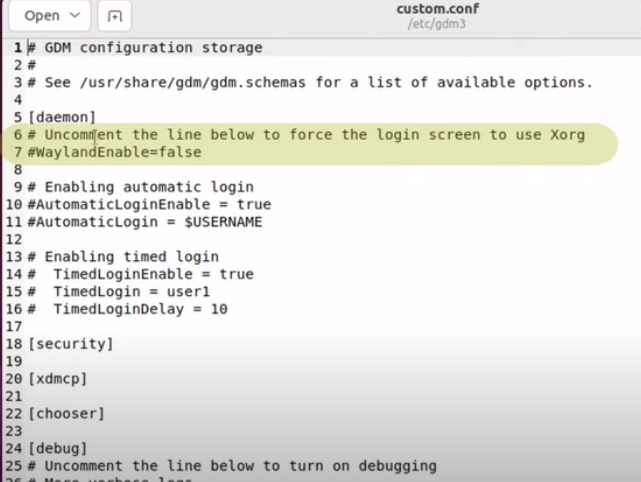
- Uncomment line 7 "WaylandEnable=false"
- Uncomment line 10 "AutomaticLoginEnable = true"
- Uncomment line 11 "AutomaticLogin = $USERNAME" (note change to $USERNAME if a different value was there)
Then re-boot the Linux machine.
Auto Upgrade Produced White Screen
Issue
Victoria's computer was restarted and updates took place automatically. When restarting there was a white screen and so little contrast that the computer was unusable.

Resolution
Graphics card needed a specific driver, not the generic driver that was in the auto-upgrade file.
Steps taken
Pressing the right shift button repeatedly brought me into the grub menu, I could select to start in recovery mode. Launching the older version of Ubuntu produces a normal contrast screen but it was stretched and could not be fixed using the display settings (locked/non responsive).
I rebooted and next time selected the newer operating system in recovery mode.
In recovery mode, I selected package repair, then grub menu then proceeded.
Screen was stretched and unable to fix with resolution.
Under Settings/about/software updates/ additional drivers, I selected a proprietary graphics driver, then re-started. All was normal.
Moodle Upload Very Slow
Moodle was running very slow when uploading any files, this affected students uploading screenshots as well as uploading audio files when creating the course content.
Resolution
It was identified on the forums that when the server runs ClamAV Anti-Virus Manager, it causes Moodle to hang-up when anyone tried to upload files.
It was then identified that there is config file that specifies to check for virus updates 24 times a day. This can be updated to check 0 times per day or less to reduce upload time.
In a forum it was stated: I found my problem.. I should have been using clamdscan instead of clamscan. That way the control is instantly transfered back to moodle after upload"